(Pretend there are cute photos of pins here. I do not feel that taking pins from my board is an adequate photo source, but I do try to provide links to the original source. Also, I do not take photos from a source and put them here. Permission should be required.)
Ribbon feathers, fabric colors...everything is so cute. It's hard to decide.
This post is sort of inspired by a friend of mine that I had recently made some stuff for. She was amazed at how I attached fabric to clothing.

There's no real miracle in the process. Find a photo, image, or coloring sheet online that has the look you are going for to use as a template, apply heat n' bond to some fabric, trace template on paper side of heat n' bond, cut out, iron on fabric. Fairly easy. But I thought I would provide a simple tutorial for those who may have never done something like this before.
Here we go.
I liked the idea of a turkey on some piece of clothing. I decided it should be a skirt. In my mind it is very cute and will look awesome.
So I got started.
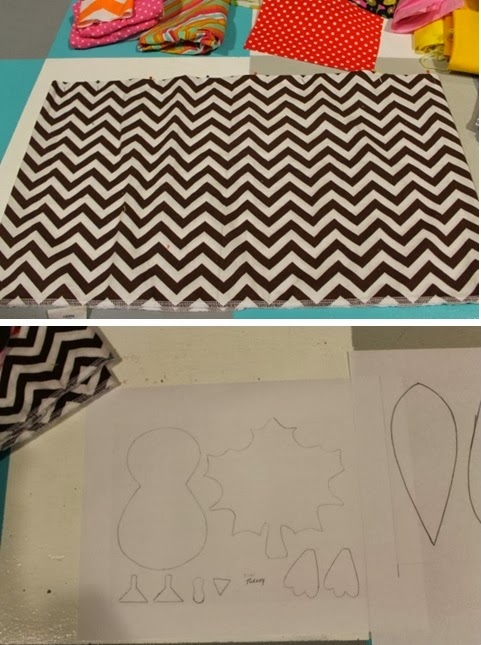
First up...skirt fabric. And template.
I had some brown chevron fabric leftover from the fedora hat project and it was just the right amount left to make a skirt for the girl.
Next...gathering the fabrics I would need to create the turkey.

Now, here is a very important decision to make:
Solid, gingham, or chevron?

All are good options. I went with solid because the gingham and the chevron were a little hard on the eyes. They would definitely work better with a solid background.
Now that I had my fabric, my template, and my heat n' bond, everything was ready for assembly.

Turkey body and feather, and roll of heat n' bond. Template came from a google image search. Easy enough.

There are two sides to heat n' bond. One side is paper and the other is the gluey side. It's shinier on that side so you can tell the difference.

I ironed the fabric to the heat n' bond. I made sure it was bigger than the template piece so that I could cut it to the appropriate size. This is done by tracing around your template on the paper side of the heat n' bond and cutting out your piece.


Everything is ironed and ready to cool off. Then, cut out your pieces.

I preassembled the turkey and feathers to see how I liked it. Not bad.
Now, we are ready to peel off the paper side.

The glue is adhered to the fabric and it is shiny on that side. Make sure to put this side on the fabric, otherwise you will glue it to your iron and that is a pain...I am assuming.
I placed the feathers on the skirt piece (no iron yet) and noticed that some of the colors let the background bleed through. We can fix this a little.

A piece of white cloth added to the offending feathers should do the trick. I ironed the feathers to the white fabric. Then added more heat n' bond to the white fabric so I could then attach it to the skirt.

Hmmm...a cat paw. I had a little visitor in my studio while I was working on this project one day.
This is Amelia. She is one of three feral kittens that showed up in the yard one day. She was named after Amelia Earhart because she was the one most likely to disappear.

Turns out she was the one that stuck around. Over time her brothers disappeared. Not too long ago one of them came back. Poor thing looks like he had it rough though, but he still comes to the house for food. It also turns out that she is not the greatest helper, but she got a warm place to explore for a bit and she likes attention. Also, she kind of drools when she is happy.

Once it was attached I needed to stitch everything down so it wouldn't peel off later. The stitching adds an extra level of security to the creation.

I tried to use matching thread for the pieces of applique. I think contrasting threads would be nice as well, but I am not that great at sewing curvy lines and didn't want to chance messing it up, so I kept it simple.

All done. Looks nice. The pink is a little darker, but still cute.
Next, the turkey needed a face. The skirt needed to be hemmed, and the casing made so the elastic could be threaded through.

Done, done, and done.
Now let's stop right here and talk about expectations, some more. You know how sometimes you have an idea in your head and it seems like a pretty good one? You can see how the end result will look and it's wonderful? But then when you finish the project it's not quite like it was in your head. Ever have that happen?
For me this is sort of one of those projects. Don't get me wrong the end result is ok, just not fantastic like it was in my head.

Overall it's a cute skirt. The idea I had in my head doesn't quite match what I was hoping for, however.
Mr. Turkey is a little too big for the skirt piece. And he could be a bit lower, closer to the hem line. And he's kind of stiff. The skirt doesn't gather like I had hoped with the applique added to it. Maybe with a couple of washes the heat n' bond will loosen up and I will like it better...? We'll see.
But all in all it works. He's pretty cute. I just need to hand sew his facial features to make sure they don't come off later. I am looking forward to when my girl wears it. Photo to come later.
*update: I had my girl try on the skirt to see how it would fit and it actually looks fairly good. My worries need not be so bothersome, it looks nice on her. :-)
Ack!! That turkey skirt is adorable!!!!!!!! Think I would get some strange looks if I tried to wear one myself? :)
ReplyDeleteThanks, Dana. In my excitement to finish the skirt I didn't think about the whole picture...the actual outfit. She doesn't really have anything in her closet that will work and brown leggings have been hard to find this year.
DeleteI'm sure you could think of a way to make it work for adults. :)