Friday, June 29, 2012

Nightgowns

The girl was in need of new pajamas and I didn't see any in the store that I was willing to pay for. So we went shopping for fabric instead. I love the green-gray-black big dot fabric. It will probably be a skirt for her, and maybe one for me, too. Maybe a circle skirt? But I want to try out that technique before I cut into this fabric.


I made my own pattern to sew nightgowns. I used an existing dress that had the cut and shape I wanted for this project. I assembled my tools: dress, paper, pen and scissors.


I traced around the dress making a front pattern and a back pattern. The front pattern needed a lower neckline than the back pattern. I chose my fabric. The girl loves Minnie Mouse so I chose that one for the blog. I measured down about 19 inches to make sure it would be long enough.

Creating a pattern to use does take some trial and error until you find the right adjustments for your project. But with pajamas it doesn't have to be exact...it's bedtime wear not everyday wear. If something is a little off, no matter, it's still perfect for bedtime


For this project I didn't want the "tank" look so I didn't use the upper portion of the pattern piece I made. I wanted to add my own straps to it later. I drew my line from the under arm to the bottom of the nightgown. I angled the line a little to get some flare at the bottom. I made the neckline straighter and used the pattern piece to cut out the arm holes. I cut out the front piece and the back piece.


I serged the edges of my pieces and they were ready to sew together. I lined up my side seams and sewed those together.


Be sure to iron all seams. It really does make the finished project look so much better.


Pin and sew the arm holes, the neckline, and the bottom hem. Almost done. I had a small strip of white bias tape that I used to make the straps. I sewed the open end of the straps and then cut to the length I needed. I pinned them to the gown to be sewed on.


A finished project! One nightgown ready to be worn.


I made three nightgowns to add to her pajama pile. Now we won't run out of things to wear to bed before laundry day. The geo-hearts nightgown was the first one I made. It is lightweight and kind of stretchy. I think I should have used a zig zag stitch for it because I think I lost some of the stretchiness with a straight stitch. With the green-blue-yellow flowers I made the pattern a little bigger on the sides by adding to the seam allowance and dipping the neckline down a little more to make it easier to fit over her head. It's roomy on her. Then came Minnie Mouse, with a straighter neckline and added straps. It, too, is roomy on her.


Getting pictures of her in her new nightgowns was hard. She does look good with them on.

I thought the Minnie Mouse gown was a bit too roomy and the straps kept falling off her shoulder. I remedied that by adding a pleat in the back. I sewed it at the neckline and a few inches below that to pull it in a little more that the sides. You can kind of see how it puckers by her elbow where the fabric can once again be free. Her straps stay on now and if she grows and needs more room I can let out the pleat.


It was an interesting undertaking to create my own pattern and try it out. I think pajamas was a good place to start. If it was something more important I think the process would have been more frustrating.

I apologize for some of the bluriness in the photos. It's the bad lighting I currently have in my sewing space. Once I get my sewing/craft space built it will have better lighting, because I will have windows to let in more natural light. My current space has no windows and the open door does not let in enough natural light, it faces the wrong way.

Enjoy!

Random P.S.: I am loving my new grouping skill. It is so much easier to get multiple pictures in one photo upload.


Tuesday, June 26, 2012

Whale: Unfinished

Super cute shorts for my super cute son.


This project is unfinished because I want to iron on a whale to a shirt using the same fabric. I just haven't done that part yet. Or how fun would it be to cut out the colorful individual whales to iron onto the shirt? Just thought of that. Might be cute. Would take some careful cutting on my part and some patience. Hmm.

I got the fabric from Wal-mart. I hardly ever remember the name of the fabric or who designed it. But I did look it up. The fabric is Oceans Away Whale of a Tail Blue manufactured by Springs Creative. I also have this fabric in a purple with more girly colored whales that would be perfect for the girl.


He looks  like he is almost ready to go to the beach. I love bright and fun fabric that I can use for boy projects.

I also love how I was able to group those three pictures together. Took me most of the morning to figure it out, and I made it harder on myself by not searching online for instructions sooner, and by finally remembering an additional step to save the picture, but I did it! And it looks awesome!
Go me!

Next time it won't take me nearly as long. I should write myself some instructions though, it will save me the trouble of trying to remember how to do this in the future.

(The back view)
I used the KID Shorts tutorial from MADE. Thanks Dana for being so wonderful and sharing your awesomeness with the rest of us.

Next time I will post the complete project. May even be able to get the girl whale outfit completed as well and get both of the kids to pose for pics. We'll see. I can usually get one to agree, but not both and still be able to take some great photos.

Friday, June 8, 2012

Route 66: Bag, hat, shorts


(Get Your Kicks on) Route 66

If you ever plan to motor west,
Travel my way, take the highway that is best.
Get your kicks on route sixty-six.

It winds from chicago to la,
More than two thousand miles all the way.
Get your kicks on route sixty-six.

Now you go through saint looey
Joplin, missouri,
And oklahoma city is mighty pretty.
You see amarillo,
Gallup, new mexico,
Flagstaff, arizona.
Don't forget winona,
Kingman, barstow, san bernandino.

Won't you get hip to this timely tip:
When you make that california trip
Get your kicks on route sixty-six. ...


-Nat King Cole (written by Bobby Troup)


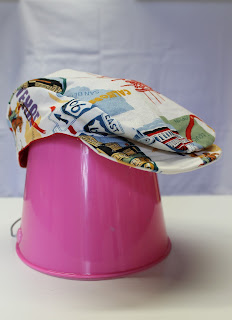
I had seen this Route 66 (2002 Alexander Henry) fabric a few places online and at Joann's. I didn't know what to make with it until I got the book Oliver + S Little Things to Sew: 20 Classic Accessories and Toys for Children by Leisl Gibson and found a pattern for a messenger bag. Fabric, idea, and a pattern equals a project.


A bag that can be used for traveling that is about traveling. Genius! And perfect for my nephew who now lives in Texas and close to Route 66. The blue one is his.


I couldn't stop at just a bag. Or two. If you are traveling then you need a hat. So I made a hat. I have found a pattern (several actually) for a newsboy hat. The Gatsby Hat pattern is what I used for this particular hat. Pinterest has helped me find inspiration for tons of projects.


If you have a bag and a hat, then obviously you need some shorts. I made some Racer Shorts using Dana's tutorial and pattern. She's awesome!


Everything is set for an adventure. Combine all three peices and you've got yourself one handsome boy ready to travel!