This is the first ever soap box race put on by the local 4-H club.
I will be doing some rambling to go along with the photos. :)
As part of the summer reading series that the public library did, a representative from the 4-H club did a little talk and activity with the kids. We happened to be at the library that day when she began talking about holding a soap box race. My ears perked up at that.
I had seen some soap box races on t.v. I think there is even a derby that comes through SC, but I hadn't heard about it in years. I don't know if they still do it here. Those soap box races are pretty competitive, and look like so much fun! I definitely wanted my kids to participate, if they wanted to of course.
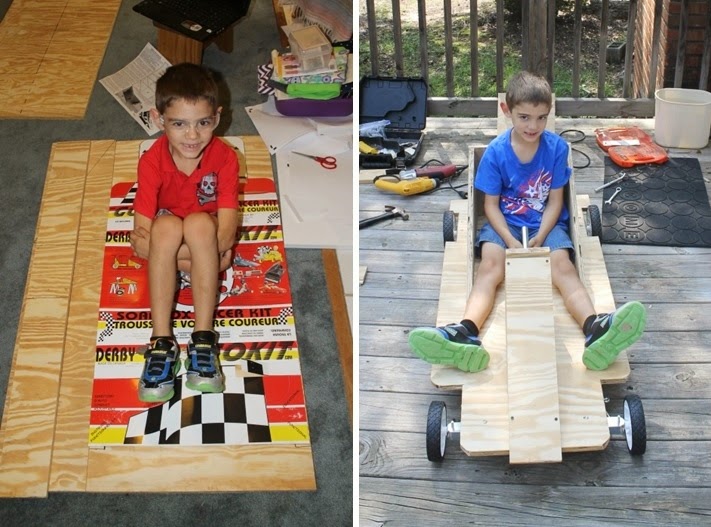
They wouldn't let my girl participate because they thought she would be too young to help with the power tools and what not.We got our kit after paying the $25 fee. $25! Yep, that is cheap, and we got a t-shirt, and the wood was semi-pre-cut for us. We just had to follow the instructions to put the kit together, and measure the pieces and cut them from wood. Easy peasy, right? wrong.
The basic soap box kit is from Canada. I have determined that either Canadians are extremely good at putting things together with minimal instructions, or Americans have been spoiled with numbered, simple instructions with photos to go along with the step-by-step directions. No one online had anything posted about how this was supposed to go together either. I thought about writing a post about it, but didn't have time to take the photos needed for the explanations. Maybe another time.
My husband cut out the pieces I had measured and drawn on the plywood, according to the pictured instructions with measurements. I put the car together. I also realized that maybe Canadians aren't that good at algebra either. It's "a squared + b squared = c squared" Canada!
Some of the pieces were too short for the steering column so I used some extra wood pieces and cut what I needed, if needed, to make it work. It turned out pretty good. I engineered a breaking system using a lever and some old flip flops for friction. I couldn't locate a go kart steering wheel anywhere in my area so I resorted to cutting it out of wood with the template provided in the kit. It works.
Then, we got to the painting of the car. I decided to use whatever we had on hand, which meant leftover paint from my studio floor painting project. The white and the blue were fine. I was going to add some gray to it as well, but that paint had gone bad and the smell of it was just awful. :(
Once it was all done, we got in a little practice in the driveway to make sure everything worked like it was supposed to work. The kids enjoyed it. So far so good. The girl almost took out the decorative windmill, and at one point bumped into the car. Help me when she starts driving if her skills don't improve.
Then, it was....
Race day!
Ready to race! Man that looks like so much fun. As part of the requirements for the race the drivers had to find a business to sponsor them and either donate canned food or money to the Harvest Hope food bank. The boy asked his daycare to be his sponsor. I was so glad they agreed. I printed out a sticker to place on his soap box like a real race car.
After a minor repair to a rear wheel we got in some practice runs.

The speeding avenger! That is the name of his car. He didn't win the award for the most creative name, but I was told he was in the top three. Yea!
Also, like a real race, they held a drivers meeting. You can see my son off to the left side of the photo with his bike helmet on.

He's waiting on me to help get the car up the ramp. I was having some technical issues with his roll bar. The screws weren't holding it together very well. Ugh.
Ready at the top, belted in, ready to race!
And they're off!
We were told that we could push them across the finish line because they wanted all of the cars to finish. Even though there was a little slope to the parking lot, it wasn't enough to get most of the cars to cross the finish line without help. Friction slowed them down. Didn't even need the brakes after all.
So once he stopped I jumped over and pushed him the rest of the way in his first heat. He won that one. He lost the next two and was eliminated. There was no need to jump over and quickly push him, he was losing by a long shot.
Right beside the ramp was a speed limit sign, which I thought was hilarious. I love the contrast to the back of the kids' shirts. There was a local police officer there to help with security, and he got out his radar device and clocked some of the cars going 12 mph. Ha! Speeders!
Time for the awards ceremony. He got his participant ribbon and certificate. He sort of really wanted one of the trophies, but we just weren't fast enough. Also, he may have been the lightest and youngest that day. The heavier kids/cars got more momentum going downhill.
At the end of the races, the drivers took a group photo in their cars. There were some pretty neat designs, and a lot of hard work went in to making those cars. The kid in the orange car, on the right, with the checkered flag, won the whole shebang! I think he also got the award for the best paint job.
Great job kids! Hope to see you all again next year.