Showing posts with label studio. Show all posts

Friday, June 13, 2014

1930 Singer Treadle Sewing Machine

Guess what I have? Can you? Can you guess?
Yep. You read the title correctly. 
I have been admiring antique sewing machines since I started my own self-guided education into the world of sewing about 4 years ago. Has it been that long? It doesn't feel like it.

On our trip to Savannah we were poking around in different shops and found a couple of older singer sewing machines. I thought it would be nice to have one in my studio. Something old, loved, useful, and a reminder of this art that has been going on for hundreds of years before I decided it would be fun to learn to sew. But, the ones we saw in Savannah cost a bit more than I was willing to pay for something to sit on a shelf and be gawked at.

Left photo: Tybee Island lighthouse family house/museum. Top/bottom right photos: antique shops in Savannah.

Anyway, one weekend my husband wanted to go to visit his family and look through a storage unit that they were renting to house all of his grandparents' things after they passed away several years ago. They had a bunch of stuff and I told him to not bring anything back home. We don't have room for anything else in our house, it is crowded enough. 

He said ok. 

When he returned there was stuff in the back of the truck, and it didn't look like a little bit of stuff. I frowned at him. He said, "I know you told me to not bring anything back home, but I think you will want this." I wasn't so sure. Then, he pulled the tarp/covering back from the bed of the truck to reveal a treadle sewing machine! Of all things! 


And now it is mine. But it comes with some stipulations. It's the same deal that we made with his uncle over another piece of furniture that hub's grandfather made. I keep my fabric in it. 


I can't paint it or get rid of it. I have to keep it. Deal!


Apparently this wasn't the only antique sewing machine that this family owns. There is also another antique sewing machine that was electrified. I am not sure if it is in the storage unit or the uncle's house...?


We set it up in my studio once I cleared out a little place for it. The kids creative area will be a bit smaller, but they will just have to live with it.

My "new" sewing machine needs some cleaning and a little love. I'm sure it could use the touch of a professional to get it into proper working order. It also needs a new belt, the one that was with it is broken, before it can be used for sewing. And then I have to learn how to actually use it.


I did some research online and learned that it was from 1930 based on the serial number on the machine. 


Thank you wonderful husband for not listening to me. :)


Some of the writers of blogs I follow actually have an antique sewing machine that they still use because the new-fangled machines just don't cut it. Mostly I like to think that going back to the simplicity of a treadle machine is cathartic for them and brings back lovely memories from childhood. Sentimentality is a wonderful thing. And you can sew if the power goes out so it is also practical. 


We put it in the corner next to my modern sewing machine that came from the same grandmother. Now they are both mine and I will treasure them. I'm not sure how much use I will get out of the treadle, if I can get it into proper working order, but I do see it being useful in housing projects that need attention. I'll try to not let it collect too many unfinished projects and make sure it gets the respect it deserves.

I like thinking about how a treadle sewing machine changed the lives of early 20th century women. Instead of hand sewing everything, this prized possession came into their home and they could make so much more for their families in a shorter amount of time. The pioneers of home machine sewing. 

I'm sure in 1930 owning a home sewing machine was a big deal, and not a cheap one as well. I think of the show, The Waltons, and Olivia sewing something for her children during The Great Depression, and how appreciative they were of anything that they owned during that time when so many people had little money. A treadle sewing machine must have felt like a luxury.

Today, in my world, owning a quality embroidery machine would by my sewing luxury. Do you have a sewing luxury?

Friday, May 9, 2014

Oh, what a two weeks it has been

And I am exhausted. I want another break but things have got to get done. Lots of things. I don't want to talk about any of them right now. I want to hide, but I am a responsible person and need to face it all head on because it's not going to go away if I hide. It'll be waiting for me. *sigh*

One of the things I have been wanting to do since the weather warmed up was to get my studio back into some sort of working order. 

How in the world did all of this stuff fit in my studio in the first place and where am I going to put it all? This was just the stuff that was in my way and needed to find a better home.


Reorganized studio? Check that baby off the list! I did it. 


I am so thankful for the warmer weather we have been having lately, and the sunshine. Loving every minute of it! It has been great to get back in my studio now that things have a place and I can find things again, or at least have a better idea of where things are now. Woohoo! I'm even getting some projects done. Mostly projects I had started but didn't finish for reasons I no longer remember. Things are getting done now and it is awesome. I can see the floor and have my work space back.

Time to get more projects completed, especially ones that I have control over.

Happy Mother's Day everyone! And remember, Eve was a mother to all things before she had kids. Enjoy.


Wednesday, October 2, 2013

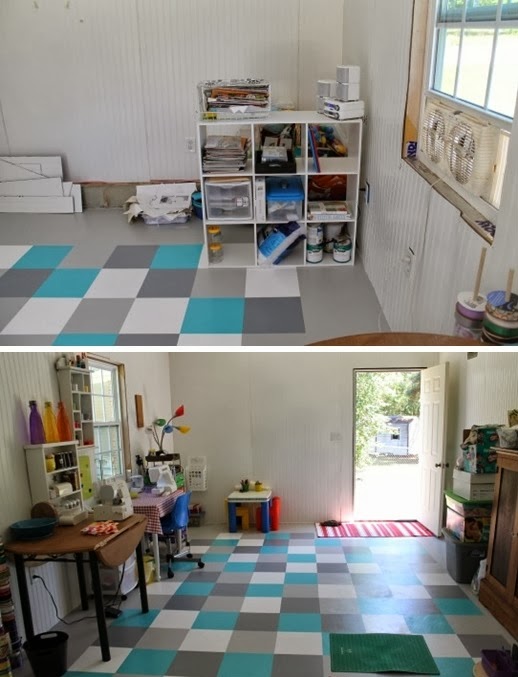
Studio Tour

It's here!
The tour you've been waiting for.
Come on in!


My door. Ignore the dirty siding, I am not that tall.
Enter...


Panorama of my long wall. Piecing together photos is kind of hard. I don't have Photoshop. This one actually turned out decent. The other, not so much. You've been warned.
This long wall holds fabric, scraps, bins and boxes of clothes for upcycling projects, ironing station (which also holds fabric), and my craft bookcase (which is not big enough to hold all of my crafts).


The not so good mash-up.


This is my other long wall with windows. This is where work happens, sewing and serging, notions and organization of odds and ends. It's a work in progress.


Left: Arrows pointing to: blue tin buckets for scissors, pencils, sewing tools, green apple bowl for pins, my New Home sewing machine, and my new blue swivel chair from Ikea.


Right: Arrows pointing to: my shelf I got at the consignment sale for just this purpose, and my Singer serger.
For the kids:


This is the kiddie corner. They have their own little table and buckets and bins of toys, paper, coloring books, crayons, pencils and markers. Hopefully they will stay occupied while I am occupied.

A 360 view:

I haven't had time to decorate the walls much at this point. I have projects and crafts in mind for that. I have plenty of white space to work with and I am going to enjoy decorating it!


My shelf I assembled. I wasn't sure if I was going to put this in my studio or in my daughter's room. Her room is the next to be organized. I think I will keep it, and maybe purchase some more just like it, whenever I save up more money that is.


My additional pendant lamps I need to hang over my sewing table and ironing station. They were on clearance at Hobby Lobby. What I love most about them is that they plug in to any outlet. They don't have to be hardwired into the electrical system, which means if I move things around I can also move the lighting where it is needed the most. A must for me, because I do change things up sometimes. Just ask my husband.


My work areas:


Kid work space and my work space.


I love working on the floor. It gives me enough space to spread out and look at the bigger picture of projects I am working on. I'm sure having a craft table would be nice, but I can't walk through a table.
Loving my work stations:


I have decorated a little. I found a nail to hang up my Singer sign. It may not stay in that location, but it's up for now.


I retrieved my blue state fair ribbon from the fridge and moved it to the studio along with the item that won it.


It may not be the most perfect of work spaces, or aesthetically pleasing to the eye, but I love the fact that it is done, well for the most part. Let's say it is 99% complete. I love that I can find everything I need, that I have a place to put everything I need, that I have my own creative space. There's a lot of love going on here.


I apologize for the darkness and slightly off focus photos. I am not a professional photographer and only occasionally get a great photo, but it's a skill I am working on improving.
I do love my new creative space. It fits my creative side perfectly. I love the open feel of it, the colorfulness of it, the brightness of the sunlight streaming through the windows and door (even though the windows are on the north side). I just love it!
I hope you enjoyed the tour! Thank you for visiting

Monday, September 30, 2013

The Setup

My studio is beginning to take shape. Here's the process of getting everything in its place.

Caulking completed and scaffolding taken down.


Right photo: a cleaner view.


Before and after photos of caulking:


It's not perfect, but it does blend in the seams.  I like it.


Looking in and looking out.


Left photo: so much space to put stuff.


Ready to assemble and setup organizers: Ignore the mess in my house. I am getting around to it, eventually. I have small children so my house will never be clean again.


 Both organizers made it to the studio and are ready for assembly!


Assembled and ready to store things.

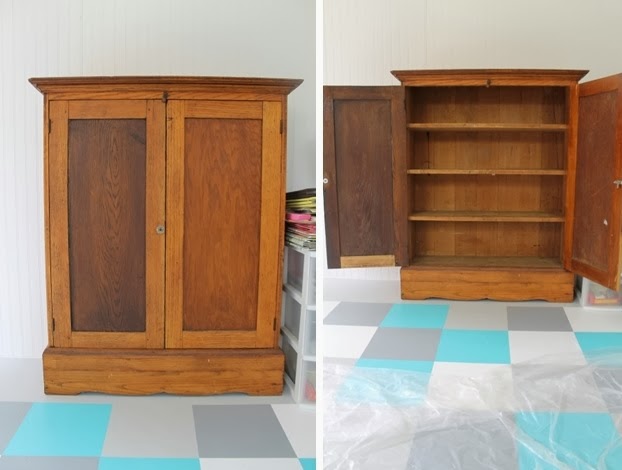
Now this is a nifty little cabinet. My husband's grandfather made it. Once I discovered this little beauty sitting in their kitchen I fell in love with it.

I moved it in all by myself (and probably should have waited for help), but I did it with the help of a hand truck and a couple of ramps. "Give me a lever long enough and a fulcrum on which to place it, and I shall move...furniture." I'm pretty sure that is what Archimedes meant to say when talking about his wife.


When the grandparents both passed away, and the children took what they wanted, the grandchildren got to take anything they wanted that wasn't already spoken for. I asked for this cabinet. If no one wanted it, it was going to stay in the house and one of the cousins wanted to paint it!. No painting this cabinet.

It will be used to store my fabric.

No fabric.


Lots of fabric. Now that all of my fabric is in one place, I was kind of amazed at how much I had. It is so nice to have it all together where I can see it and get to it easily.

Some wonderful things I rediscovered!


I have been itching to finally hang up my Singer sewing machine sign. Love that thing. I've been searching for the box with my thread and odd and ends, and I finally found it when I was moving stuff in. Hooray! Also, found my girl playing in a tote. She's such a helper. Well, she didn't really help per say. She played and explored and talked...and talked....and talked. My kids have not learned that it is ok to just be quiet sometimes. They're so noisy, and kid noise can get annoying, and overwhelming for me.

This is just a little taste of how my studio turned out. I will be putting together a tour that should be up sometime this week.

Happy Monday!

Monday, September 16, 2013

For all intents and purposes...

It's done.

Done!

Finally...done.

Keep your expectations low ok.

We are not great at this sort of thing, but we put a lot of effort into it based on our non-existent construction skills. We don't have Mandi skills. I bet she could do an amazing job completing the finishing work of my studio.

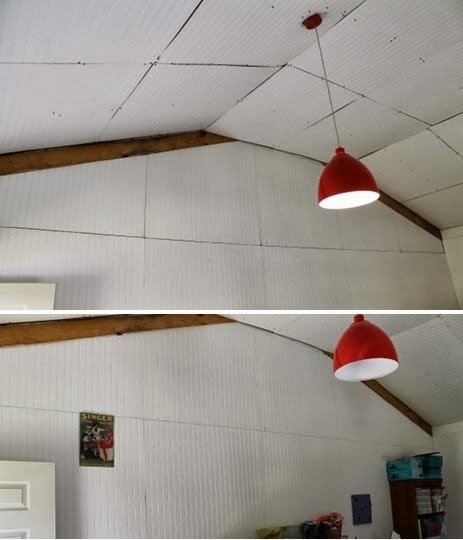
Over the past week, and weekend, the hubs and I have been working on my studio. The insulation is now behind a ceiling instead of being the ceiling.


Everything is piled together that I had moved into the studio so I could do something before we were able to finish it.

My view from the scaffolding the hubs built. Sturdy construction is not his forte, but after some helpful suggestions from moi, it's not too bad.


The wall paneling now reaches to the ceiling instead of just 8 feet.


It's awesome. Not awesomely built, but it's done. Completion was the name of the game, the goal, the finish line...and we did that.


I'd say I am in 100% able-to-work-in order. I am roughly 97% absolutely done order.

I am in the process of caulking the seams to help them blend in better. The dark lines are pretty stark compared to the glossy white paneling. The caulk is helping.

I have accepted that it will never be perfect, that it will never have a "professional" feel to it, and I am ok with that. It feels like me, mistakes and all, and that is perfect.

As I inch closer to the 100% mark there some things that won't get done for a while, like trim work in the corners, baseboards, windows and door, and the upper wall where it meets the ceiling (to help hide some of the measuring/cutting mistakes that are fairly noticeable and caulk can't cover that much without looking silly).

Once the caulking is done I can officially move all of my stuff in and get to organizing and decorating.

The icing on the cake!

The fun stuff!

Or at least I hope it will be fun.


Some things I learned throughout the process:
-I am not Tom Silva. (explained in an earlier post)
-I am not Mandi. (check out her blog and you will see her amazing construction projects)
-Communication is hard, especially between spouses working on a project together.
-My husband thinks the belly button sweat circle on my shirt was cute. That's love y'all.

Like my new blog header? I worked hard trying to get everything to fit. It has a Fall-ish feel to it, don't you think? The photo is one I took in my yard with this flower my husband planted and has decided it likes where he planted it and just grew and grew. The butterflies seem to like it, too.

Saturday, June 29, 2013

Caution: Slippery when you put socks on

So, I sealed the floor and it looks A-mazing. The paneling doesn't have the greatest caulking job between the joints, but it'll do.

Before and after:


Well, it's not the best job, but the lines look a little lighter and actually blend in better in person. Some areas need more caulk but I didn't want to open a new tube of caulk until I could get the rest of it done so as to not waste any of it. Once I put in trim the bottom and corners will look better, too.


The other walls caulked. I like walls.


The top photo: sealed floor. And it works. I left the windows open to help it dry. I did a walk through 24 hours later and it was dry. Then, I noticed that there were water droplets on the floor. It had rained earlier that day. Apparently, hard enough to come through the screened window and on to the floor. Nothing seeped into the concrete, so I did a good job sealing it. Easy wipe up! Love that.
Then, I moved my sewing table in, and another table for the serger and ironing board so I could get back to sewing. It's enough to get me started. I have a feeling that as time goes by I will be moving in more fabric and notions until the ceiling and rest of the walls are complete. I can't help it, I like things to be together. But, that's what boxes are for. I can pack it up and move it out of the way, and then organize it when the studio is 100% complete. Good idea, Me!
I had three repairs to do and one ironing project to finish up another project. It was so nice to be able to do these minor projects in my own space. Also, I like to work without shoes on. I noticed that a sealed floor is slightly slippery in stocking feet. Something to remember. The sealant also makes it easy to sweep. The dirt just slides across the floor.
Projects in the works and coming soon!

Thursday, June 20, 2013

I...am not Tom Silva

Please tell me you know who Tom Silva is. Anyway, it's been a while since I posted about my studio construction, and I have an update. Yea!!!

Unrelated side note...when did being excited and saying "yea" change to "yay"? "Yay" is not correct. It's just not. And every time I see it I want to take a red pen and mark all over the offending persons post (as I see this online the most). It's "YEA" people! Yea.

Ok, back to my update...
My semi-coworker friend and his wife came over to the house to help put insulation in the ceiling and hang some paneling. Thanks Ryan and Anna!


And it looks great so far!
The insulation definitely helps with keeping the hot air out of the room. Such a nice improvement.
Ryan finished the long wall with no windows because it required cutting out for sockets and I didn't have the tool to do it. (I had hung three pieces prior because they didn't require cutting). Then, he came back on Saturday and finished the short wall by the door, and hung some more insulation as there was only a little bit left to do when we stopped working Friday night.

On Tuesday, my day off and kid daycare day, I did the window wall and the other short wall, all by myself. And it shows. I mean, it's not pretty, but it's not the worst. I am not Tom Silva, you know. But I do rank myself above what Lucy and Ethel would have done.

Here's how we rank:
Tom Silva (the best)
Me (not the greatest, but I could be useful on a work site)
Lucy and Ethel (well, you've seen their work on tv)

My measuring and cutting skills need improvement. I didn't ruin anything, so that's a win. A little caulk, some trim, and it will look even better.

I cleaned up the studio so I can seal the floor. I wiped down the walls to remove lots of dust from cutting, and swept the floor. I need to mop to remove the fine dust and spot clean some areas that need a little more help. There are some gray marks on the wall from using the circular saw and I am really hoping that a magic eraser will remove those marks.


Mostly clean! I had put down some plastic on the floor for protection from scraps from ladders, dust from cutting paneling, and from tracking in dirt from the outside. It looks so nice all cleaned up and wiped down. I plan on mopping the floor this weekend before sealing it, and caulking between the panels to help them blend in better.

Once I get that done I can move some things in and get my crafting and sewing on. I won't completely move in until the entire room is complete so I don't have to move too many things around to actually finish the studio.

And that's the update. I am looking forward to the actual construction completion so I can get to the decorating and organizing of the studio (my forte...much more so than construction).


Monday, May 13, 2013

Floor: Before and After

So, I've been painting a cement floor, in case you haven't noticed from the last 4 posts. Sorry about that, but I will be moving on to other topics soon, mainly the wall paneling and ceiling, because we haven't talked enough about that already.

Here is a before and after photo I put together...


I used Behr paint and the colors are-
    Topcoat: Pacific Gray (I think, I didn't bring home the booklet and I can't find it online.)
      Squares: Ultra Pure White
                   Diving Dolphin Gray
                   Gem Turquoise

I am smitten with this paint scheme and colors. I love it. It's so beautiful.


I think I am at least 98% complete now. No more touch-ups needed. I have to wait for the paint to cure before I seal it, and now that I put the paneling in the room, I have to wait to get that installed before I can move on to the next step anyway. So, until I get to that point I can just sit and stare at the floor, which isn't so bad because it's so pretty.