Wednesday, September 19, 2012

Beach Robe: MADE pattern

Dana was having a sale on her patterns and I had some money in my paypal account. I had been wanting to buy the Beach Robe pattern for a while. I just thought it was the perfect thing to take along to the beach, or pool. So I bought it.

I had been stocking up on beach towels ever since I saw her post. I had the perfect towels for my boy and my girl. All I needed was the pattern and time to do start/finish a project. And a trip to the beach was coming up soon, so I had to get to work.

Finished product:

 
I used a pink and white striped beach towel for the girl and yellow bias tape for the edges. I think it adds a much needed pop of color. 
 
 
I found a dark blue and white striped towel for my son. I didn't want to use red bias tape because I wanted to avoid any traditional summer holiday colors. But it did need some something to make it stand out more. The lime green bias tape was the perfect find. When he outgrows it his sister can wear it, too.


Because of the way the stripes were laid out on the towels, there were not any leftovers to make hoods. The pink robe has long sleeves, while the blue robe does not. I used the already finished edge of the towel for the short sleeves, mainly because it was available, looked good, and I didn't want to sew on any more bias tape than I already had to. Win, win.
 
 
Now we just needed the beach.
 
 
We had never been on a family trip before. Mainly because we don't plan ahead for things like this, we already have so much to do at home the way it is, traveling with small children is hard. We opted to wait until they were both older, sleeping reasonably well at night, potty trained, and halfway traveled well.
 
I also wanted to go to the beach to just get away for a weekend and have fun. I didn't want to go in the middle of summer when it would be crowded and expensive, and hot. So, the middle of September just seemed perfect, and after peak season is a great time to go. The weather was great! Sunny and warm, nice ocean breeze to keep you from getting too hot. Just nice.
 
On the way to the beach we stopped to eat lunch and the kids enjoyed their very first Happy Meal from McDonald's.


I think the enjoyed them. Especially the toy that came with it.
 
Once we got settled into our new home for the weekend, we got ready to head to the beach.
 
The kids in their beach robes:
 
 
They had such a good time playing in the water and the sand. It was just one big sandbox for the girl. Eventually they were brave enough to play in the water. Once I showed them that they could just sit in the water and have the waves come to them, it was hard getting them out of it.
 
It was a fun trip. I look forward to seeing them explore new places and have different experiences again. Of course I will have to work it around the school calendar next year though.


Monday, September 17, 2012

7 years

On a beautiful Saturday afternoon on September 10, two people got married and started a life together, as one.


My husband and I try to stick to the traditional wedding anniversary gifts as much as possible. The modern ones seem so strange but the traditional ones are cute, well, cute to us at least.

For the seventh wedding anniversary the traditional gift was copper/wool. Hmm. Pinterest gave me the perfect idea, and I got to work on it. Here's what I made for my hubs.

Pennies are made of copper. Well, sort of. But for the purposes of this gift, they represent the traditional gift of copper.

I located four pennies with important years on them that represented our lives. One for each of our birth years (1979 and 1980). One for the year we started dating (2001) and one for the year we got married (2005).

 
I thought finding the ones with our birth years on them would be hard, but it wasn't. Finding one from 2005 proved to be more difficult.
 
 
I drilled a small hole into the top of each penny.


The purpose of the holes is so that they can fit onto a key ring, which can be put onto his key chain so he will always have them with him. A simple project that serves as a constant reminder of our life together so far.
 
Also, for our anniversary I picked up a composition notebook. When we were dating we wrote letters to each all the time. That sort of dried up some after we got married, and when the kids came along our letter writing is pretty much nonexistent. There are times that I think of stuff that I want to tell him or find something that I want to share with him but the timing doesn't work out well and it gets stored in my head. Now it has an outlet. We can write to each other again and when we have time, we can respond, and hopefully continue to build a strong marriage.


The total package: Notebook, pennies, and a card. We keep it simple around our house.
 
 
Pretty photos of me and my dress.
 
 
My absolute favorite photo:


All we need now is a continued happy life that God will provide us with.


Friday, August 24, 2012

Three-piece Boy Outfit

I had bought some fabric at Wal-mart. I am very bad at remembering what kind of fabric I buy and who made it or produced it. So anyway, when I saw this fabric I knew it would be perfect for some church pants for my growing boy. I bought extra because I wanted to make him a hat to match it. And then while I was on Pinterest I started seeing some cute photos of boys wearing vests.

Light bulb moment! Make him a vest to match the hat and pants for a completely adorable outfit.

So I got to work.

*Warning* This post will be loaded with photos. Enjoy!


The cute little newsboy hat. Free pattern found here.

The vest pattern found here. It's free and a size 5T.


I made pants from using Dana's free pattern. I added to her pattern to produce a better fit for my son. The pattern is a 2T-3T. I added around the seam allowances to give him more room, added to the top of the waist because he has a long torso and to allow for sewing mistakes by me, and adjusted the length for my long legged boy. I love how they turned out.
 
I didn't make this shirt. I am not the good, yet. I did, however, find it in my son's closet when I went looking for a shirt to go under the vest. To my surprise I found the perfect one. I knew he had button up shirts that were too big for him but this one was the perfect color. I had bought it last year at one of the children's consignment sales and purposely searched through the bigger sizes to find cute things for him to grow into.


When you put all three together (four if you count the shirt) with an agreeable little boy, you get this.


And this---
 
And more of this---


More handsome-ness---


Black and white, and Sepia adorableness:


We didn't have the proper shoes to go with this outfit so I opted for his black light-up tennis shoes. Or "batman shoes" as they are known in our house.

He likes his new clothes and that makes me happy.


Thursday, August 16, 2012

Big Girl Bed

It's been 4 years, 4 months, and a few days that the crib I bought for my first born child was first used. It had stayed in the same room, in the same place the whole time. The only thing changing was the children. Once number two was coming the boy moved to the other bedroom in the house and got his own big boy bed right off the bat. He was getting a little too big for the crib anyway, so we skipped the whole toddler bed thing with him. But for the girl, well, she is growing, but she is still little and I just don't want to get her into a twin size bed just yet.

I am taking the crib to my parents house to give to a family friend who is expecting her first baby in December. That way I don't have to discard it or store it. Perfect solution.

When I think about not having a crib in the house any more it reminds me that my children are growing. Fast. They are no longer babies. There will be no more babies in the house until one day, a very long time from now, when we might be blessed with grandchildren. The sadness of this realization only stays for a little bit because I am totally excited about the girl's new big girl toddler bed! I can't wait to makeover her room more and make it more toddler/preshooler friendly and less babyish.

Because I am loving me some Pinterest, this is not an original idea by me. I found this pallet toddler bed on Pinterest (links back to the original source with tutorial at her new website). Thanks Lori Danelle for sharing this project.

Go ahead and check out the link...I'll wait. Really.

Ok.
Isn't it cute?
I love it.
I want my girl to have one.

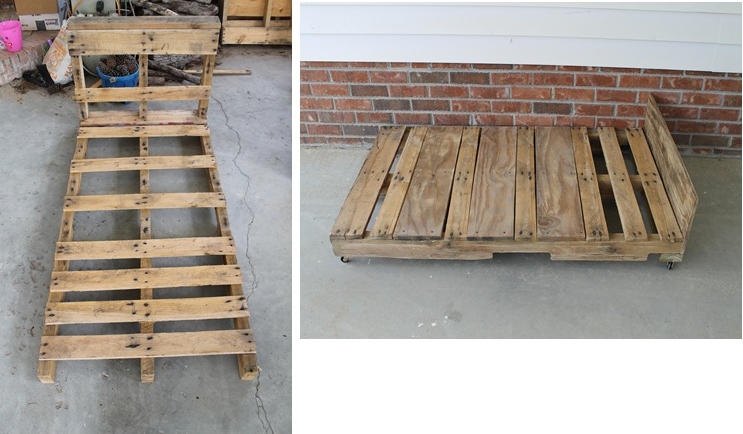
I brought home some pallets from work; brand new, no age, used only once. I found this long one and knew it would be perfect for the base of the new bed. No piecing together!


I had removed a few of the slats that were split. This pallet was way too long for a toddler bed, so I measured how far down I wanted the mattress to go including a headboard and cut the bottom part off. It got used for the headboard. Nothing wasted.


The first picture shows the premise of the finished product. By the time my complete idea had been formed the frame was still a little too long and the headboard was a little taller than I wanted it to be. No problem. I had a friend from work stop by the house and cut new slats for me from plywood, even out the bottom of the pallet, cut the footboard shorter, and shorten the headboard.

The second picture shows the frame completely put together. The new slats were added. The footboard was already the size I wanted it but a bit too long. So he cut that for me as well, and the 2x4 to hold the casters at the end for the bottom. The footboard sits on top of the 2x4 so that it would be higher at the end. I attached four small casters to make moving easier, and I am so grateful I did. It was much easier to push around the carport and the bedroom once I moved it inside.


What it will look like when it is all said and done. Cute.

I needed to drill holes for the brackets to hold on the headboard and then move it into the house for final assembly. It required some cleaning and moving of things to make room for the new bed and the crib. The crib does not fit through the door.


Before:
The crib and a messy room. The crib converted to a toddler bed so she could get used to it first before I got her a new one. Although it was time for the crib to go, it's kind of sad, too. Stop growing children! Time to cleanup and make room for the new bed!


I cleared out the same spot that the crib was in for the new bed. I attached the brackets to the frame and the headboard. All was ready to move into place and fixed up.

After:


Looking good already.


All made up. Almost. Oops, forgot the pillow.


There, all ready for the big girl to sleep on it. Once I finished taking pictures I realized I needed to wash the comforter so I put her ABC quilt on it instead.


Now it is ready for my growing baby girl. This particular bed is really, really low to the ground. But that is ok, she sort of had to climb into her crib/toddler bed. And when/if she falls out of bed she won't have as far to go. She did fall out of the previous bed a couple of times. Since it is so low there is no room for under the bed storage. I guess if I needed to I could attach some posts under the frame to make it taller, but by the time that would happen she'll be ready for a twin bed.

It's weird walking into her room and feeling like it is more open. The crib had some height to it so when you walked in you noticed it even if you weren't going to the crib. The tallness of the crib is no longer there so that whole space feels so open now. Since the bed is much shorter than the crib it feels like you have walked into a room for an elf, everything is miniature.

When she walked into the room she gasped a little and said, "Ohh". I think she liked it. The real test would come at bedtime and if she would sleep in it. She's a good sleeper and adapts to change pretty well.


And we have a winner! She has been enjoying her new big girl bed so much that she wants me to come into her room to look at it. "Come on, Mommy. Come, on." She'll take me by the hand and lead me to her room and want to play.

I hope she never outgrows it. *sigh*


Total cost for this toddler bed...under $12.
The brackets were $7, and the casters were just over $2 per two-pack, so a little over $4 for all four. I had bought some plywood to use for the new slats but I ended up not using that plywood. Everything else was stuff we already had on hand.

Once she has outgrown it I may re-purpose it for my craft room, or in put it in the yard for more enjoyment. Either way it will have a long and useful life at our house.


Tuesday, August 14, 2012

Super Hero Wrist Cuffs

The boy has been asking how Spider-man shoots webs. Now that he knows the webs come from the wrists he wanted some too. I had seen on one of the blogs where Kate made Superhero cuffs at See Kate Sew. I thought something like that would be perfect for my super hero loving child.


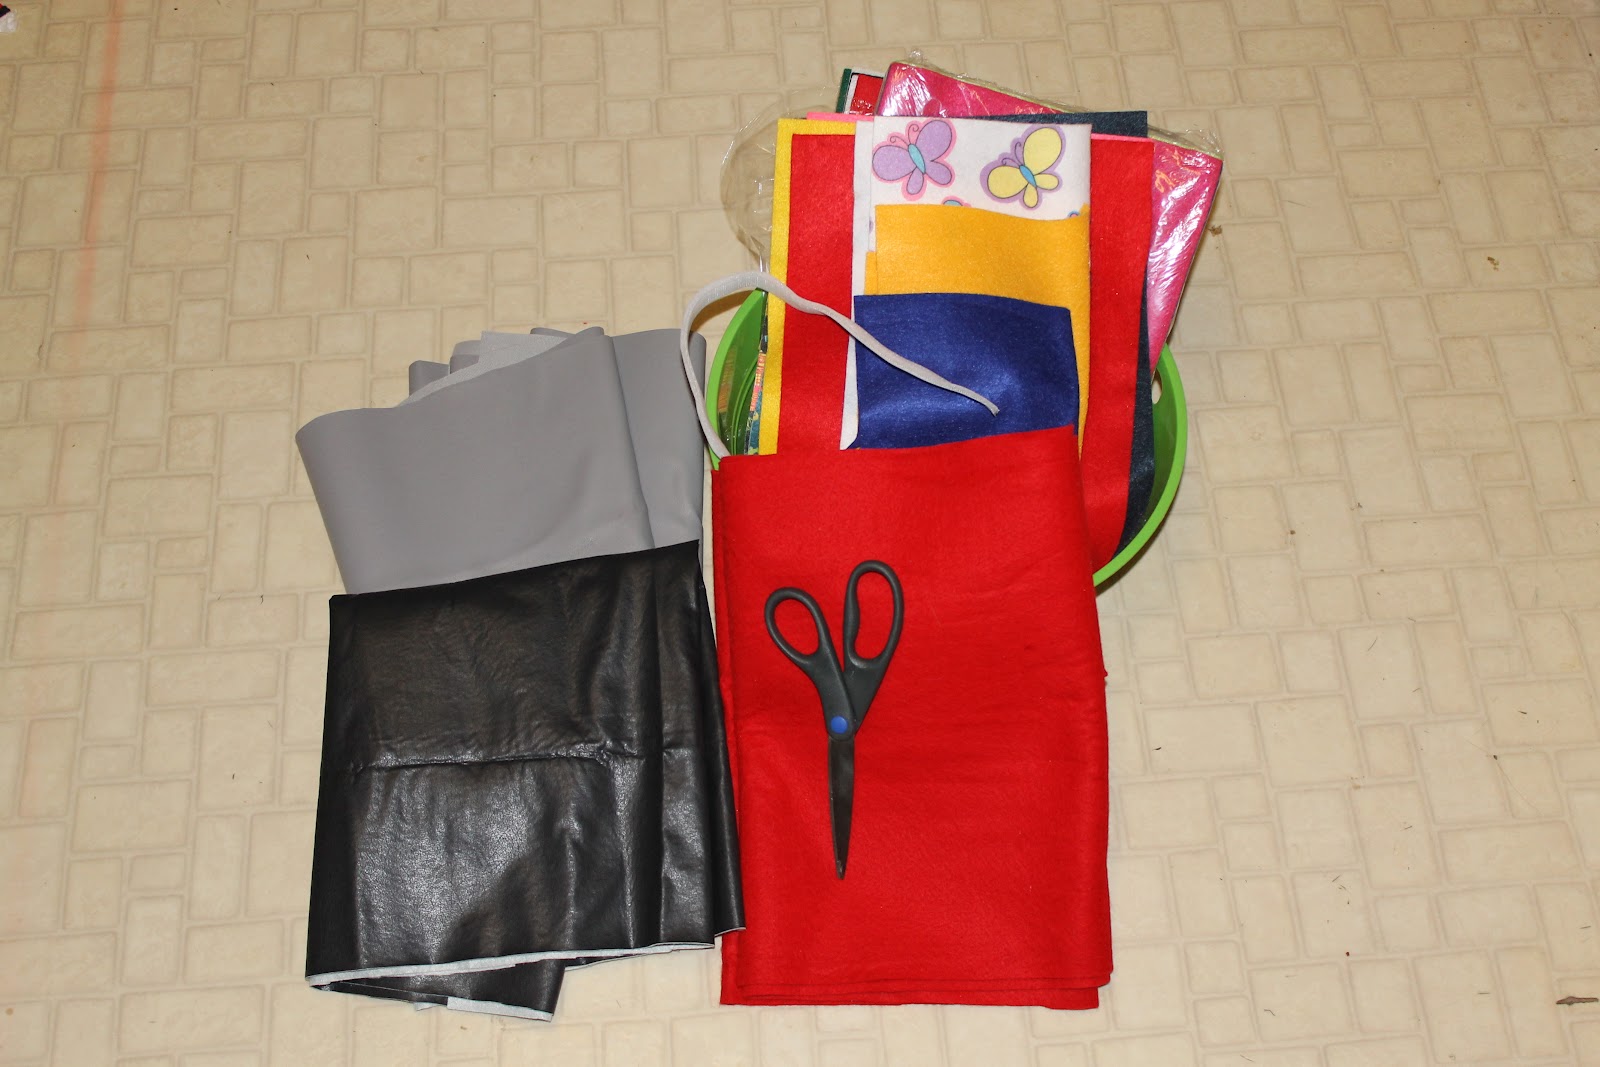
I gathered my supplies. Felt, vinyl fabric, scissors, glue, and velcro.


I free-hand drew a spider using one of the boys' Spider-man action figure. When I got to the batman one, I decided to look online for a pattern. Jackpot! So much easier than drawing one. Drawing is not my strong point. I just cut out one side of the spider legs and flipped the pattern over for the other legs.


I measured the boy's wrist and added a little for overlap. The wrist cuffs are about 2.5 inches wide and 6.5 inches long. They are a little big for his wrists so I could have made them smaller but they don't turn around on his wrists when he is wearing them, just roomy.


I used a fabric glue to put the felt shapes on the vinyl fabric. Attaching the blue felt circle and the red spider was easy. Attaching those to the vinyl worked fairly well with fabric glue. The velcro, however, was a different story. The glue took a really long time to completely dry before they could be used. After I waited overnight the velcro still wasn't attached enough so I used hot glue. Hot glue works every. single. time. It makes life so much easier.

Of course if the boy needs super hero wrist cuffs then so does the girl!
 
I cut butterflies out of some felt that was covered in them and glued them to some gray vinyl fabric. This particular vinyl fabric didn't have a fuzzy back to it so it may be a little scratchy on her but she probably won't notice. She'll be happy with butterflies.

I have a few more I want to make for them, but this will give them a good start in playing and pretending.


Ignore the kitchen floor, it has always looked that bad since we moved in, but it will hopefully be getting replaced soon. I finally got ahold of a contractor who sent someone out to the house to look at the water damage from the dishwasher. Just waiting to hear back from him. And then, hopefully, I can get my room construction started!, oh and a new kitchen floor.